Publish articles from iA Writer to your static site
Publish articles from iA Writer or any other micropub-enabled application to your static site with Netlify Functions. My hope with this project is that with less friction to write and publish a note/article, I’ll do it more.
On May 13th, 2020 iA published a blogpost with new features for iA Writer. One of those features was support for micropub, an open API standard to create/edit/update articles on blogs.
Since iA Writer is my favourite tool to write blogposts, it would be amazing if we could remove the step where I paste the content in VSCode to commit it to my blog repository. I’m planning to use this feature mostly for my new “Notes” section, used for short posts that require little formatting and editing.
In order to do this we need a couple of things, we need a place to accept the API call from iA Writer and somehow and convert that data to a format that can be rendered with middleman, my static site generator of this moment. Ideally I would not run a server just to accept a webhook every once in a while and this is where Netlify functions come in. (or any lambda-based system, such as AWS Lambda, and you can even do this with GitHub actions).
To make all of this work, we want to accept the new article payload from iA Writer and create a new file on GitHub with their API. This will in turn trigger a new Netlify build which will include the new content.
In order to write a file on GitHub we need a personal token with repo write access. (Unfortunately GitHub’s authorisation framework is not great and it’s an all-or-nothing kind of deal regarding personal tokens, so make sure you keep it in a safe place and NOT in public code. (or any code for that matter)).
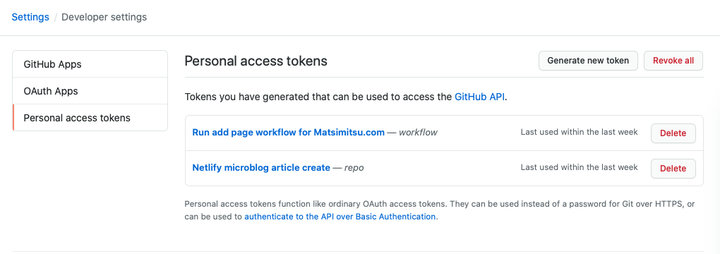
Under your GitHub profile go to settings and “Ceveloper settings” > “Personal access tokens”.
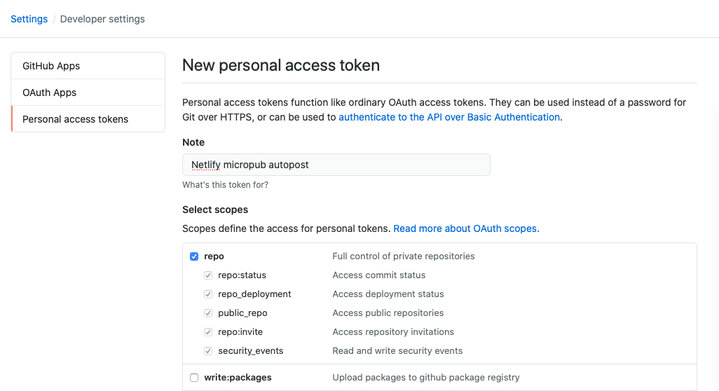
Create a new token with a descriptive name and only the “repo” scope checked.
In order to use the token in our Netlify function, we need to expose it to the function, we can do this through “environment variables” on Netlify. You can find this under the “Build & Deploy” tab of the “settings” of your application.
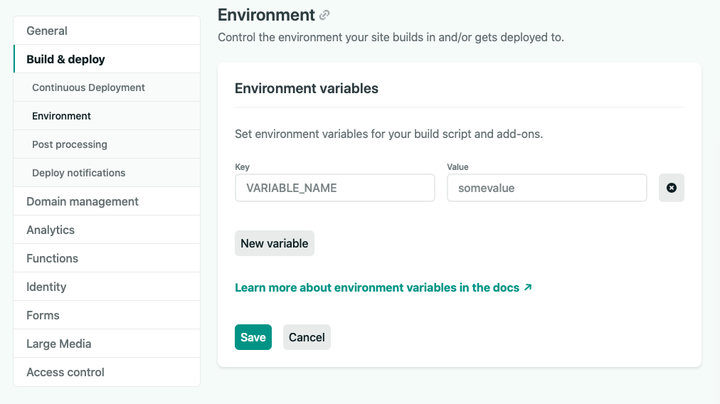
Let’s add a new environment variable called GITHUB_ACCESS_TOKEN with the token from GitHub as the value. While we’re here lets also add a token we can use to authenticate iA Writer when it posts to our Netlify fuction.
Create a second environment variable called TOKEN with a random value.
iA Writer has a bit of a weird flow when adding a micropub endpoint, it follows these steps:
Parse the html page from the config and discover a <link> tag. Instead of providing an URL to the endpoint directly, iA Writer expects an url to the root of your site, where it will attempt to detect a <link> in the <head> of your html with a rel of micropub, for example:
<link rel="micropub" href="https://<blog url>/.netlify/functions/micropub">
Call the endpoint as GET with the token provided, this should return a config for the micropub API. Once the micropub endpoint is discovered, iA Writer makes a GET request to the endpoint, expecting a JSON body in return, where it can detect the features of your micropub service.
It’s perfenctly fine to return an empty JSON body in return:
  return callback(null, {
    statusCode: 200,
    body: "{}"
  });
When posting call the endpoint as POST with the title/markdown as JSON
iA Writer expects a “redirect” header as a successful response and will open a browser window to this redirect target to show you the posted content.
  return callback(null, {
    statusCode: 201,
    headers: {
      Location: "https://<blog url>/notes",
    }
  });
(This works if you have a CMS that posts the content instantly, in our case you’ll see a page without the post, since Netlify still has to build the new site).
In order to satisfy the first step for the setup flow, let’s add the required metadata tag to the ”
<link rel="micropub" href="https://<blog url>/.netlify/functions/micropub">
This link in the header should point to the Netlify funcion we’re about to create.
In order to accept micropub content from iA Writer, we need to write a Netlify function that can handle both a GET request to return the config and a POST request to handle a new article.
For more information on how to setup functions, see the Netlify functions docs.
In order to create a new page on GitHub, we only have one dependency the @octokit/rest package, which you can install in the root of your Netlify App with your favorite package manager, e.g.
yarn add @octokit/rest
Being responsible developers, we stored the token we used to setup this flow in iA Writer in an Environment variable on Netlify.
// /netlify/functions/micropub.js
// Our only dependency is @octokit/rest
// We use the token/GitHub auth we've set in the ENV vars before.
const { Octokit } = require("@octokit/rest");
const octokit = new Octokit({
  auth: process.env.GITHUB_ACCESS_TOKEN,
})

exports.handler = (event, context, callback) => {
  // GET request, used by iA Writer to get the micropub config
  // we can return an empty JSON here
  if (event.httpMethod === 'GET') {
    return callback(null, {
      statusCode: 200,
      body: "{}"
    })
  }

  // Verify the token we will use in iA Writer,
  // set in Netlify Env settings on netlify.com
  if (
    !event.headers["authorization"] ||
    event.headers["authorization"] != "Bearer " + process.env.TOKEN
  ) {
    return callback(null, {
      statusCode: 401,
      body: "{}"
    })
  }

  // Parse the JSON event body from iA Writer
  const data = JSON.parse(event.body)
  console.log("Data: ", data);

  // The format is a bit weird,
  // where title and content are array values with a single entry
  const title = data["properties"]["name"][0]
  const content = data["properties"]["content"][0]

  // I want the format of the filename to be yyyy-mm-dd-title-as-slug.html.md
  // Javascript date handling is poor, (no strftime),
  // lets hack something with the default date functions
  // This saves us a library to import, also use a poor-mans slug generator
  const date = new Date()
  const filename = [
    date.toISOString().split('T')[0], // the date
    title.replace(/[W]+/g, "-") // the slug
  ].join("-")
  var fileContent = []

  // If we've written a post without fontmatter, insert default fontmatter
  // this allows us to override the fontmatter in iA Writer if we want, but
  // we can also just throw out a quick article without worrying about this.
  if (!content.includes("---")) {
    fileContent.push("---")
    fileContent.push('date: ' + date.toISOString())
    fileContent.push('title: ' + title)
    fileContent.push('category: note')
    fileContent.push('---')
  }
  fileContent.push(content)

  // Create a new file on GitHub with the octokit library
  // owner/repo and message/path are hardcoded here,
  // you might want to change those to your own likings.
  return octokit.repos.createOrUpdateFileContents({
    owner: "matsimitsu",
    repo: "matsimitsu.com",
    message: ("Adding note: " + title),
    path: "source/notes/" + filename + ".html.md",
    content: Buffer.from(fileContent.join("\n")).toString("base64")
  }).then((response) => {
    // Redirect iA Writer to the notes page, where the post will show up.
    callback(null, {
      statusCode: 201,
      headers: {
        Location: "https://matsimitsu.com/notes",
      }
    });
  }).catch((error) => {
    // Log any errors, so we can debug later.
    console.log("error", error)
    return callback(null, {
      statusCode: 400,
      body: JSON.stringify(error)
    })
  })
}
Finally, let’s set up iA Writer to post to our Netlify function.
Under “preferences” there’s an “accounts” section, where we can add a new “micropub” account.
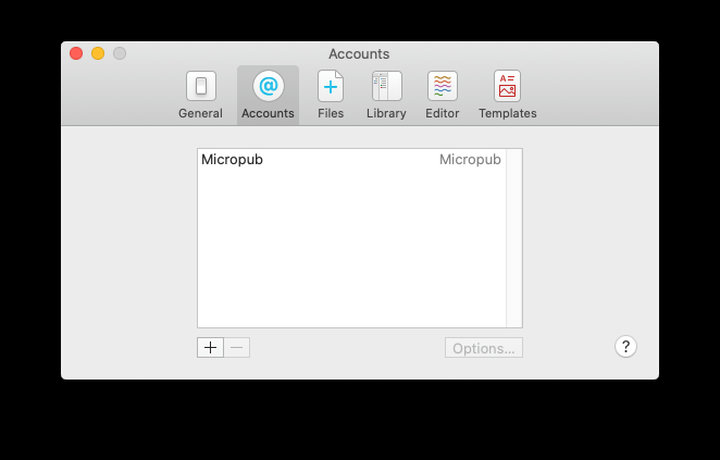
To make it a bit easier for ourselves, we’ll use a token to authenticate the endpoint and keep away from oAuth for now. In the “URL” field, fill in the root of your blog, not the API endpoint for micropub. This isn’t really explained, but iA Writer will attempt to find the endpoint by itself from the HML source of the page. Putting the API endpoint in this field here will cause iA Writer to hang until you force-close it.
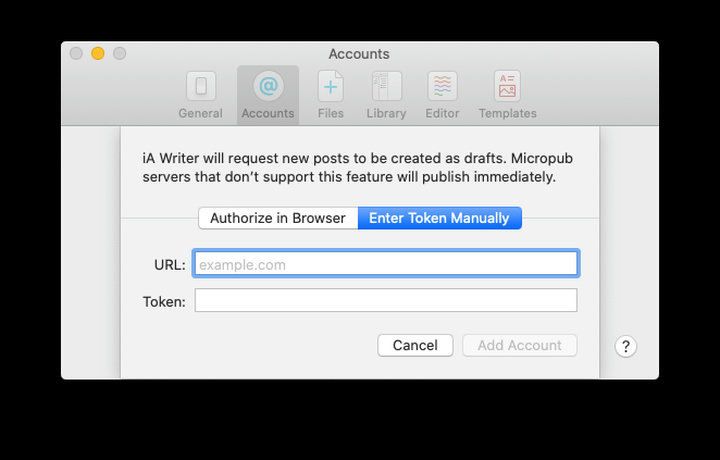
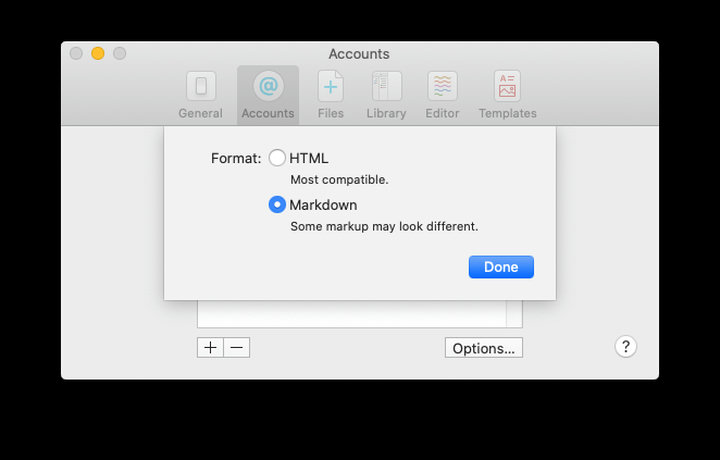
Once complete, we need to change one setting, we want iA Writer to send us the raw markdown, and not the content rendered by iA Writer in html. You can change this under the settings for the micropub account.
With everything setup and deployed we can try publishing an article. After writing some content, click “File” > “Publish” and select your newly added micropub endpoint.
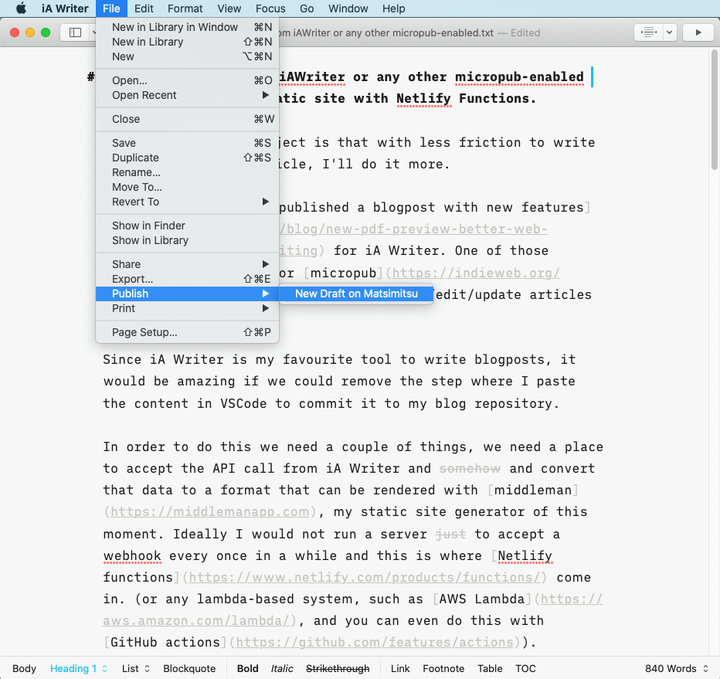
It should show a loading indicator and then open a new browser window pointing to the article url. (which might return a 404, because Netlify is still busy building your site).